


cPanel is a intuitive control panel that is a web hosting standard. Being used by the largest web companies like Godaddy, Bluehost, Liquid Web and Tyton Media, cPanel is a dependable, easy-to-use tool to help manage your website, emails, databases, FTP, domains and more…
What is cPanel?
CPanel has been around since 1997 and is the web hosting industry’s most reliable control panel. It is a Linux-based control panel that provides an easy-to-use interface and automation tools to make the process of hosting and running a website more simple.
It was developed by John Nick Koston and was released in 1996. It is now on its 60th release and its available in almost all languages. Currently, cPanel inc is a private company headquartered in Houston, Texas.
In this ultimate guide, we are going to walk through how to use cPanel to manage your website online:
- Preferences
- Files
- Logs/Metrics
- Security
- How to generate SSH keys in cPanel
- How to import SSH keys in cPanel
- How to block I.P. addresses in cPanel
- How to generate a CSR in cPanel
- How to stop image hotlinking with cPanel
- Domains
- How to create a subdomain cPanel
- How to create an add-on domain in cPanel
- How to redirect a domain in cPanel
- Databases
- How to create a MySQL database in cPanel
- How to delete a MySQL database in cPanel
- How to create a MySQL user in cPanel
- Using the MySQL databas wizard in cPanel
- Software and Services
- How to install WordPress with Softaculous
- How to install Joomla with Softaculous
- How to install Drupal with Softaculous
- Advanced
- How to set up cron jobs in cPanel
- How to add allowable MIME types in cPanel
Preferences
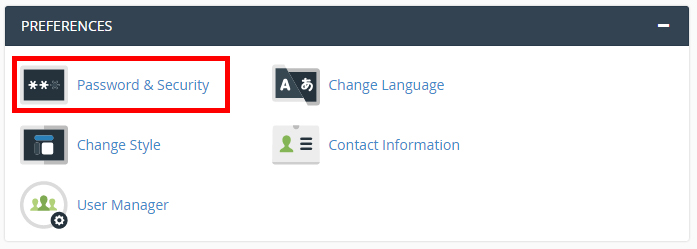
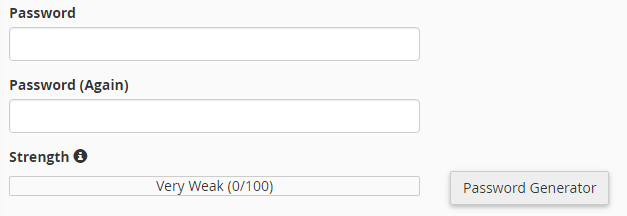
How to change your cPanel password
To change your cPanel password, simply login to your cPanel and select ‘Password & Security’ in the Preferences section.
Once you are taken to the Password and Security page just enter in your current password following by your new password twice.

We suggest using the password generator as it generates a very strong password that will help your site from being hacked.
Write down the password in a safe place on your local computer so you have it for reference.
FREE SEO Website Audit
Get more traffic online with this Free SEO Website Analysis.
Once you are ready, click the ‘change your password now!’ button and your cPanel password is now changed!
Wasn’t that easy?
Password Tips
- The system attempts to prevent particularly insecure passwords, but it is not foolproof.
- Do not use words that are in a dictionary, names, or any personal information (for example, your birthday or phone number).
- Avoid simple patterns. Instead, use UPPER and lower case letters, numbers, and symbols. Make certain that your password is at least eight characters long.
- When you choose a new password, make certain that it is not related to your previous passwords.
How to change the style of your cPanel
You can change the style of your cPanel user interface very easily. There are actually a handful of different interfaces you can use.
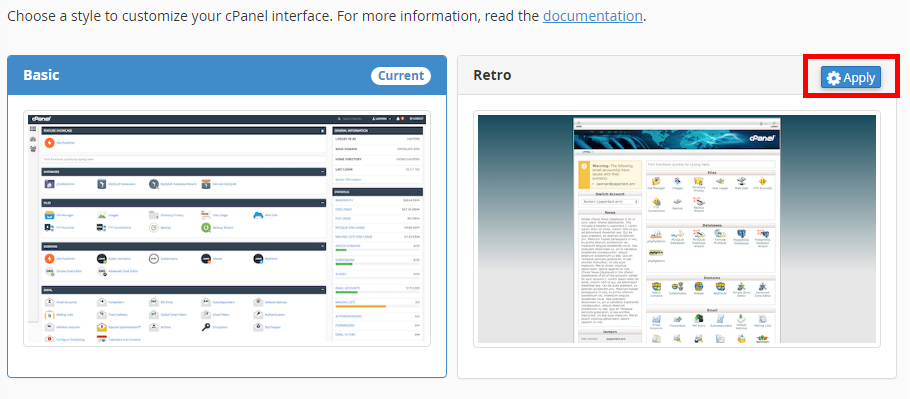
To change the style of your cPanel just login to cPanel and select ‘Change Style’ in the Preferences section.

You will be taken to a page where you can choose different styles of cPanel interfaces. We were on basic, but we are going to select the ‘Retro’ template by click the ‘Apply’ button on the Retro header.
It will do its magic and your cPanel style will now be updated to the Retro theme (or whatever theme you chose).

And now your style should look something like this…
Thats how you update your cPanel style!
Video:
How to change the language in cPanel
What if you want to use cPanel but you do not speak English or you want your cPanel to be in a different language? Its possible to change the language of cPanel, but be careful that you know the language or you may have trouble changing it back.
To change the language, login to cPanel, go to the Preferences section and select the ‘Change Language’ link.

On the change language page, select the dropdown list to view all of the available languages that you can select in cPanel.

Select the language that you want to change to and click the ‘Change’ button.

A loading pop up will appear and after a few seconds your cPanel should change to the language that you chose.
As you can see we selected Spanish and it changed our language to Spanish in cPanel.
Make sure you remember how to change the language just in case you have trouble getting back to it.
And that’s how you change the language in cPanel.
How to create an email account in cPanel
If you have linux web hosting then you most likely will create and manage your emails in cPanel.
Creating emails in cPanel is pretty straightforward:
Just login to your cPanel and go to the Email section.
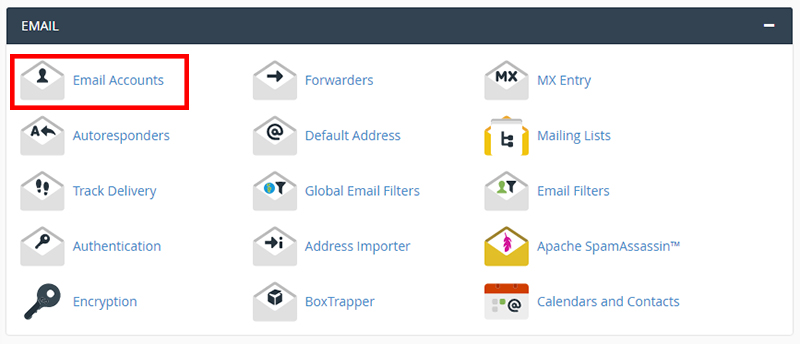
Select ‘Email Accounts’ to be taken to the Emails page where you can create and manage your email accounts in cPanel.
Depending on your hosting provider you may be able to add unlimited emails but you should check with your host.

On the Add Email Account page you will choose your desired email address.
Just enter the desired name before the domain.

Then select the domain you would like to create the email for.
This is if you have sub domains that you want your email to be connecte to.
We are going to just use our normal domain with ‘test’ as the email O(test@www.tytonmedia.com).
Next, you must choose a password for your email account.
We suggest using the Password Generator to create a very strong password to avoid email accounts getting hacked.
The next option is if you want to set a disk quota for the specific mailbox.
If you want to limit the size of avaiable space to hold emails, then enter in your desired value here or selected unlimited for no limit.

When you are done, click ‘Create Account’ and your new email will be created!

Scroll down the email accounts page to make sure that the email you created is in your email list.

That is how you create a email in cPanel.
Next, you probably want to configure a mail client so you can get your emails on all your devices.
Video:
How to check emails in cPanel
Once you have created an email account in cPanel you have the ability to check it in cPanel without even setting up a mail client.
Just login to your cPanel admin area and go to the Email section.
Click the ‘Email Accounts’ link like you are creating a new email.
Scroll down to the bottom where your list of email account is and find the email you want to view.
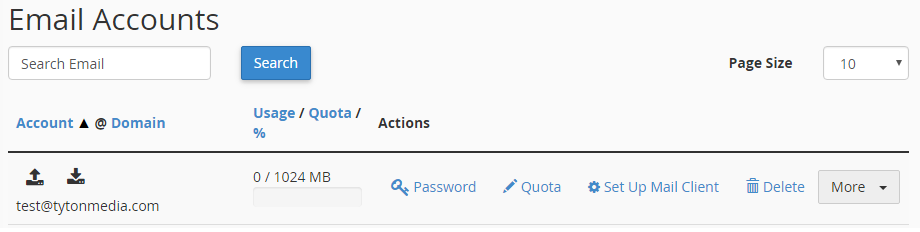
You will see a more button that shows you a few more options that you can do with the email.

Select ‘Access Webmail’ to be taken to the Webmail interface.
Here, you will have to choose a mail client that you want to view your Webmail in.
I have no preference on which one is the best, but I always use SqurrelMail… just because I like the squirrel but the option is up to you!
If you want to login to all of them and see the difference, go ahead!

So once you select your default Webmail Application, you will be directed to your inbox.
If it is your first time signing into the Webmail interface, you will be aksed to supply your full name and email address before being able to check your mail.

Enter your full name, email address (should already be there) and any other information you want to be defaulted.
Click the submit button and your Webmail is now set up and you will be directed to view your inbox.

Click the ‘Check Mail’ link to referesh your inbox and other mail items.
This is how you check Webmail from cPanel.
Video:
How to configure email Clients in cPanel
Setting up your email to work in email clients is usually pretty straight forward no matter what client you are using.
Just go to your Email Accounts in cPanel and click, ‘Set Up Mail Client’ on whatever email you want to set up.
There will be files you can download for any mail client that will automatically set up your account in the client.
You can also use the manual settings below to manually enter in your mailbox account details.

How to forward emails in cPanel
Forwarding emails in cPanel is a great way to have a lot of different emails that all go to one account so you don’t have to check a ton of email accounts.
Creating email forwarders in cPanel is pretty straight forward (get it?).
Just sign in to your cPanel account and head to the Email section.
Click the Forwarders link to head to the create forwarder page.

Once you are on the Forwarders page, you have two options:
- Add a single email forwarder
- Add a domain forwarder
To add a single email forwarder, select the add forwarder button.

Once you are on the ‘Add a New Forwarder’ page, then you will enter in the email address that you want forwarded.
We are going to forward our sales@www.tytonmedia.com email to our admin@www.tytonmedia.com email so we don’t have to create a account in Outlook for both emails.

In the destination section, you have two choices:
- Forward to Email Address: For normal forwarding to an email address
- Discard and send an error to the sender: Just gives an error and discards the email
90% of the time, you are going to be forwarding to an email address.
Now we enter in the email address we want all of the emails forwarded to.
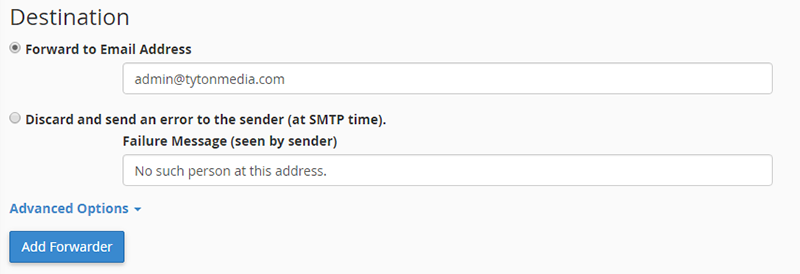
Once every looks ok, click ‘Add Forwarder’ and you will see a success message that your email forwarder is now activated.
![]()
To forward an entire domain, click the ‘Add Domain Forwarder’ button.

On the Add a New Domain Forwarder page, you will enter in what domain you want to forward and the domain you want to forward it to.
This means that every email address with @www.tytonmedia.com will be forwarded to the specific domain.
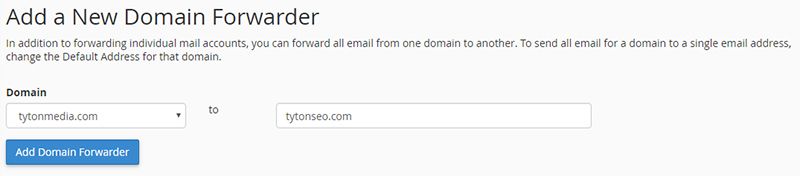
For example sake, we are going to forward all of tytonmedia.com’s emails to tytonseo.com.
Click the ‘Add Domain Forwarder’ button to save the forwarding.
![]()
You will get a success message that everything is activated.
Head back to the forwarding page and check to make sure everything is correct in the Forward Domain table.

And that is how you forward emails in cPanel.
Video:
How to view sent emails in cPanel
Do you ever wonder if the emails you sent out are getting to your sendees mailbox?
Do you ever want to see blocked spam or outgoing messages that errored out?
Then you want to track the delivery of your emails in cPanel.
To do so, log in to cPanel and head to the Email section and select ‘Track Delivery’.

You will be taken to the Track Delivery page where you can view all the incoming and outgoing email messages for that certain domain.
If you want to check a specific email recipient to see if a certain email was sent, you can enter their email in the box and select ‘Show All’.
It will show you any messages with that recipient.

The list below will show all the details of the emails for your cPanel account.
You can filter by successful emails, deferred, failures and emails still sending (in progress).

As you can see from our example, some junkmail was rejected in the first row, while in the second row, an email was sent to us, but we did not have that email so it gave us this error.
Tracking the delivery of emails in cPanel can be very beneficial for this very reason.
How to set up auto responders in cPanel
Auto responders are great if you are going out of town and you want a automatic message to reply to people sending you emails.
They are also useful if you create a new email and want to let people know your new email by sending an automatic message when they try to reach you at your old email.
To set up a auto responder in cPanel, first login to your cPanel.
Go to the Email section and select Autoresponders.

On the Autoresonders page click the Add Autoresponder button.

Now you will set up your autoresponder.
Set the character set (utf-8 should be pre-populated) and choose how long to wait to send the response.
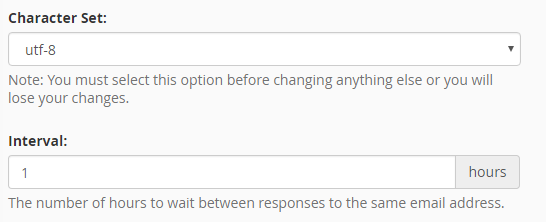
Now you must select which email you want your autoresponder to be set up on.
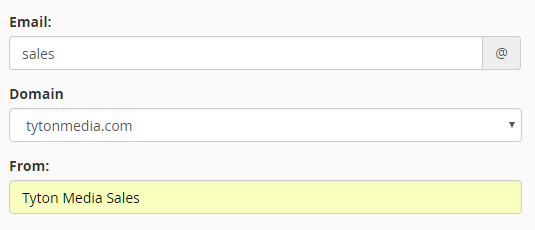
We want to set a autoresponder for the email sales@www.tytonmedia.com for when our sales team is out of the office, so we selected that email and choose a From name.
Next you have to create your email that you want to autorespond when people send a message to this particular email address.
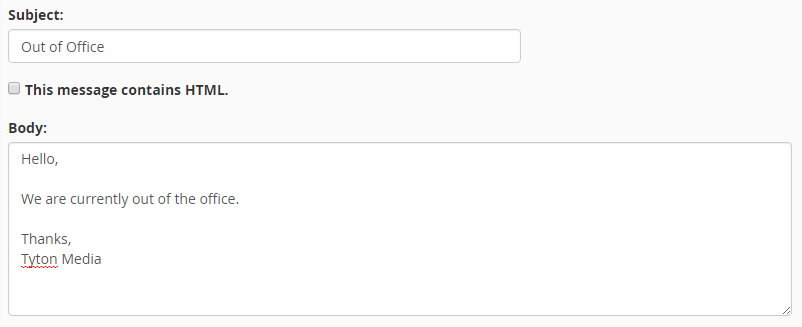
Write a subject for the email and enter some text in the body.
If you want to put HTML in your email then you must select the checkbox that the message contains HTML.

You can then choose when you want to start and stop the autoresponder.
We want it to start immediately and never stop.
Once you are ready, click ‘Create/Modify’ and your autoresponder will now be set up in cPanel.
Setting a default address in cPanel
If you want to catch any email that is sent to an invalid email address for your domain then you should set a default email address.
To do so, login to your cPanel account and click ‘Default Address’ in the Email section.

On the Default Address Maintenance page, select the domain you to forward all un-routed mail for.
If you want to discard emails that are sent to an un-created email then select the first radio button.
If you want to forward all un-routed emails to a specific email address, select the 2nd radio button.
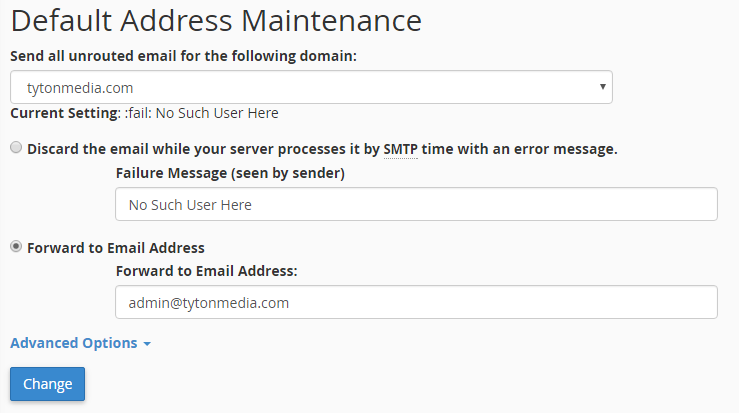
Enter the email address you would like to forward all un-routed email to and double check that it is correct.
Click the Change button and you will see a success message that your un-routed emails will now be forwarded.

That is how to set up a default address in cPanel.
Files
Backing up your website in cPanel
cPanel has a great backup feature that allows you to quickly backup your entire website, do partial backups, download MySQL Database backups, and even download all your email forwarders.
Backing up your website with cPanel is a pretty quick and easy process.
Just head to your cPanel interface and scroll down to the Files section.
Click on the backup link to backup your website.

Once you are in the backup page, scroll down to where it says ‘Full Backup’ and click the ‘Download a Full Website Backup’ button to begin the process of backing up your account.

On the ‘Generate a Full Backup’ page, select how to want to receive the backup file.
Since its so large, you can’t just download it… you will have to use one of these methods to retrieve your backup:
- Home Directory
- Remote FTP Server
- Remote FTP Server (passive mode)
- Secure Copy (SCP)

We opted to download the backup to our home directory (easiest way to do it).
Enter an email address where cPanel can contact you when your backup is complete.
Click ‘Generate Backup’ to start the backup process.

You will get a message that your full backup is in progress.
When the backup is complete, you will get an message to the email supplied, that your backup is complete.

Once you get this email, you can head back to cPanel to the backup page but scroll down passed the backup generate section to the account backups section.
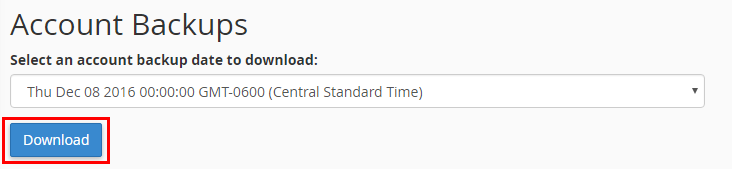
You will see a dropdown box with your backup selected.
To download the full backup to your computer, simply click ‘Download’.
It will take a while to download your full account as it contains a lot of information.
And that is how to do a full website backup in cPanel.
Working with the file manager in cPanel
Uploading, downloading and modifying files on your server is super easy with the file manager in cPanel.
If you are trying to upload or download files to your server and aren’t quite sure how to use FTP, then you can use the file manager for easy file management.
Just log into your cPanel interace and head to the Files section.
Click the file manager link to be taken to the File Manager app.

You will be taken to the File Manager page in cPanel.
This is where you can upload, download, delete, copy and move files on your server.

Here is an example of our home folder on our server.
To download files, simply select the file you want to download and select the download button at the top.

to upload files, click the ‘upload’ button in the top bar.

You will be directed to a new page where you can upload files to your server.
Click the ‘select file’ button and browse to items you want to upload.

Note that you can upload mulitple items by holding shift and selecting mulitple files.
To edit files directly, simply click on a file you want to edit and choose ‘Code Editor’.

In the code editor tool, you can edit your files directly on your server but remember to back up your files before making any changes.

When you are done editing your file, click the ‘Save Changes’ button and now your file will now be changed!
All of the other functions are pretty self explanatory… You can delete, copy and move files around.
Creating a FTP account in cPanel
FTP stands for file transfer protocol and its a way to upload and download files to and from your server via a simple interface.
But first, you have to set up the connect to your server using cPanel.
Login to your cPanel and go to the files section where you will find the FTP Accounts link.

Now you will add all your details in order to create the new FTP account.
Here are all the details you will need to create a FTP account:
- Login: the string of text before the @ symbol
- Domain: the domain of the FTP address
- Password: I suggest using the password generator for maximum security
- Directory: the directory this account will have access to
- Quota: max file upload size

Once you have filed this information out, click the Create FTP Account button.
Your FTP account will be created in cPanel.

Head back to the FTP accounts page to make sure your account was created and everything looks good.

This is also where you can change the password of the FTP account, change the quota, delete and configure a FTP client.
Too view the accounts specific FTP settings, click on configure FTP client.
It will show you the FTP username, server and port.
Just enter this information (and also the password) into any FTP client and you will be connected to your server via FTP!
Metrics
View website visitors in cPanel
Checking your latest visitors in Cpanel is a easy way to see the most recent traffic to your website using cPanel.
Just head to your cPanel and go down to the Metrics section where you will See ‘Visitors’.

Click visitors and you will then select the domain you want to view stats for.
It will show you all the domains including sub domains and HTTPS/HTTP domains.
Our preferred URL is HTTPS so we are going to click the magnify glass in the view column to see the latest visitors.

On the next page, you can see the last visitors to your website sorted by time.
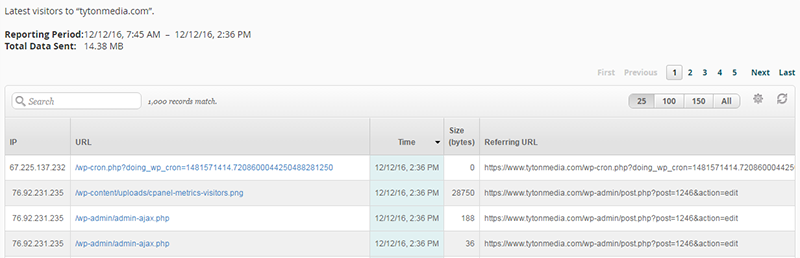
As you can see it also records internal traffic and cron job traffic.
That is because it works by saving loaded files to track visitors so you will get some internal stats but its a simple way to see your latest visitors in cPanel.
See website errors in cPanel
Viewing websites errors is really easy in cPanel.
Open up a browser and login to your cPanel.
Scroll down to the metrics section and click on Errors.

This function will display the last 300 errors for your site. This can be very useful for finding broken links or problems with missing files. Checking this log frequently can help keep your site running smoothly.
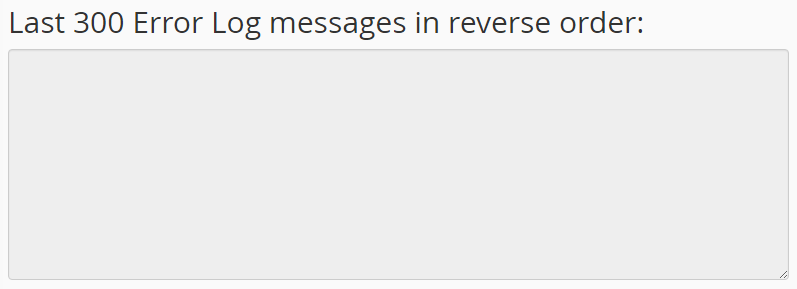
As you can see from our website at www.tytonmedia.com, we don’t have any errors to show, but this is how to view website errors in cPanel.
View bandwidth usage stats in cPanel
Bandwidth refers to the volume of information per unit of time that a internet connection had handle.
It simple terms, its the amount of data your website uses on its server.
If you have a hosting plan with unlimited bandwidth then you shouldn’t need to worry about this but if your hosting account has a limited amount of bandwidth, its smart to keep a close eye on this stat or you may end up paying more for bandwidth overages.
Go into your cPanel account and go down to Metrics where you will see the Bandwidth link.

Click to the bandwidth page where you will see a bunch of graphs that will show your bandwidth usage for the last 24 hours, pas week, and past year.
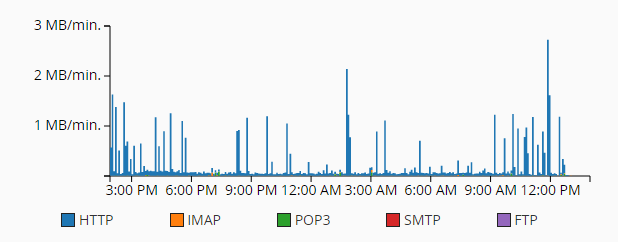
As you can see from our graph, most of the bandwidth usage on our server comes from HTTP (which means the website).
If you scroll down a little bit more you will see the last few months listed and what pieces of your website used the most bandwidth.
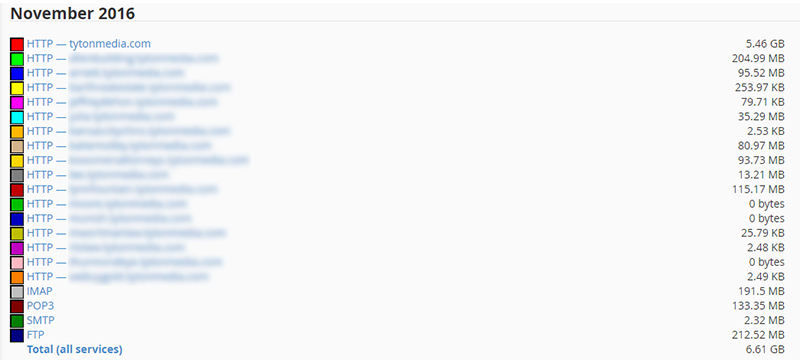
In November 2016, tytonmedia.com used a total of 6.61 GB.
If you are wanting to keep a close eye on your bandwidth, this is how to check its usage in cPanel.
FREE SEO Website Audit
Get more traffic online with this Free SEO Website Analysis.