


Godaddy is one of the leading domain registrars in the internet in 2016. They also offer web hosting, email, domain names and a plethora of other services.
For a beginner webmaster, working in Goddady can be daunting and hard to figure out alone.
This is why we have created this monstrous Godaddy how to guide that goes in-depth on how to use Godaddy and all of their services:
- How To Create an Email Account in Godaddy
- How To Setup Godaddy Email on Android
- How To Setup Godaddy Email on Iphone
- How To Setup Godaddy Email in Outlook 2010
- How to Setup Godaddy WordPress Hosting
- How to Setup Godaddy Web Hosting
- How To Setup Godaddy SSL
- How to Login to Godaddy SFTP
- How To Change Godaddy Nameservers
- How To Create a Subdomain in Godaddy WordPress Hosting
- How To Forward Domains in Godaddy
- How to Use Godaddy Website Builder
How To Create an Email Account in Godaddy
Godaddy offers a very cheap email option that allows you to create email accounts that end in your domain name….
For example, tyler@www.tytonmedia.com.
Godaddy Email Pricing
| Plan | Monthly Price | Features |
|---|---|---|
| Email Essentials | $3.49/mo | Unlimited Emails, 5GB Storage |
| Online Essentials | $6.99/mo | Unlimited Emails, 50GB Storage, 1 TB Secure Storage |
| Business Premium | $8.99/mo | Unlimited Emails, 50GB Storage, 1 TB Secure Storage, Office 2016 on up to 5 PCs or Macs |
Creating a Email Account in Godaddy
Just head to Godaddy->Manage My Domains and select the domain you want to create email accounts for.
In the account snapshot of the page, you will see a link to activate Email.

You are then taken to another page to enter the domain you want to use for your emails (not sure why you have to do this step again).
We are going to be using MrStockPro.com as an example.
FREE SEO Website Audit
Get more traffic online with this Free SEO Website Analysis.
Enter in the domain you would like to use and click Continue.

You will then be taken to a page where you will choose what email you would like to use for your professional email address.
This depends on what you will be using the email for but for the sake of the example we are going to use tyler… so that our email will be tyler@mrstockpro.com in the godaddy email settings.

Enter just the part before the @ symbol into the username box and fill out the rest of the information on the page including the password for the email.
Make sure to write down this password (and email) because you will need it later when setting up your email client.
Click create and your new Godaddy email settings will be set and your account will begin building.
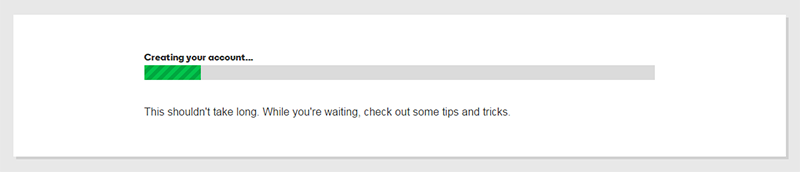
After a minute or so, your email will be all set up and ready to go!

Now, its time to setup an email client on your Outlook 2010, Outlook 2013, Outlook 2016, Android or Iphone using your Godaddy email settings.
How To Setup Godaddy Email On Android
So now that you have created a Godaddy Email account, its time to add it to your email client on your phone.
This way you can get all your business emails right to your Android cell phone or tablet!
To begin, open your phone and go to the Google Play Store.
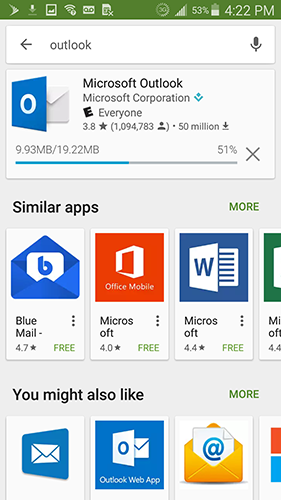
Search for outlook then download and install it onto your Android device.

Once it has installed, open the app and choose ‘Get Started’.

It will ask you to enter in your email address…
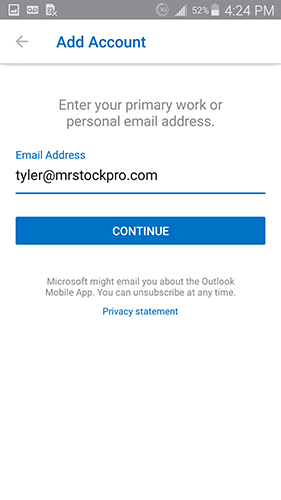
Just enter the Godaddy email address you recently created and click continue (per our example, we enter tyler@mrstockpro.com).
When you click ‘Continue’, you will be redirected to the Office 365 sign in page through Godaddy.
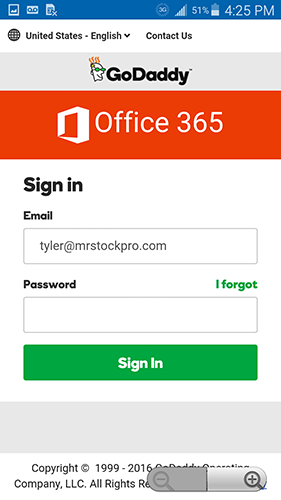
Your email should already be populated (if not, add it) so just enter in your password for the email account.
Click ‘Sign In’ and you will be asked if you want to add another account or maybe later.
Choose ‘maybe later’ and you will be forwarded to your brand new outlook Godaddy email account!

Try and send a few emails to friends, family or co-workers to make sure that everything is working correctly.
You have now setup a Godaddy email on your android device!
But what if you are an Iphone user?
How To Setup Goddady Emails on Iphone
If you are a Iphone user, setting up a Godaddy email can be quite simple and only takes about 5-10 minutes..even for a non technical person.
Once you have set up your Godaddy email, you can set it up on your Iphone so that you receive all the emails on your mobile device.
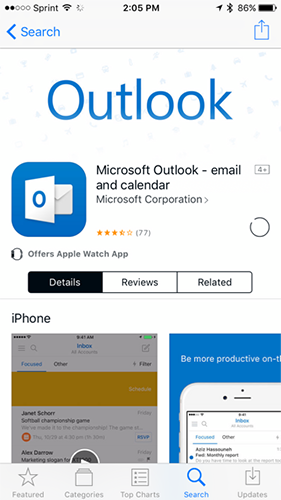
First, head to the App Store and search for ‘outlook’.

It should be the first listing in the search results, Microsoft Outlook.
This is the email client you will use to receive emails to your Iphone.
Click the ‘get’ button to download Microsoft Outlook.
Wait for Outlook to download onto your Iphone.

Once the download has finished, click the icon to open Microsoft Outlook on your Iphone.

Click ‘Get Started’ to begin the process of adding your Godaddy Email to your Iphone email.
Type in the email that you are wanting to add to your Iphone.

For example sake, we are going to use tyler@mrstockpro.com… Just type in the email and when you are ready, click ‘Add Acccount’.

You will then be forwarded to Godaddy Office 365 where the email you typed in should be pre-populated already.

Type in the password for your Godaddy email account and click ‘Sign In’ to sign in to your Godaddy email account on your Iphone.

You will recieve a prompt asking if you want to add another email to your Outlook account.
If this is the only email you will be adding, click ‘Maybe Later’.
If you are wanting to add another email, simply go back through the same process (minus downloading Outlook of course).

Congratulations! You should now be getting your Godaddy emails on your Iphone!
How To Setup Godaddy Emails in Outlook 2010
Ok, so you have created your brand new professional email in Godaddy but now you have to add it to an email client to be able to view, read and send emails.
If you are using Microsoft Outlook 2010, then it’s quite simple to set up your Godaddy email in the popular client.
Create New Account in Outlook 2010
Just open Outlook and go to File->Add Account.
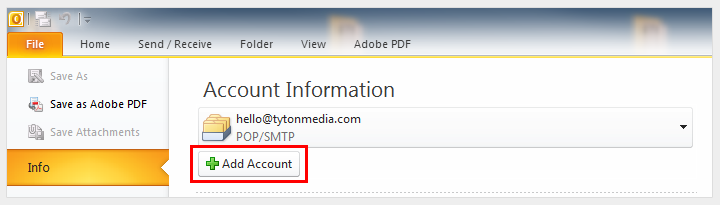
A prompt will open where you will enter in the details of your new Godaddy email account.
Enter in your full name in the correct box, then enter the email you just created and the corresponding password that you wrote down earlier.
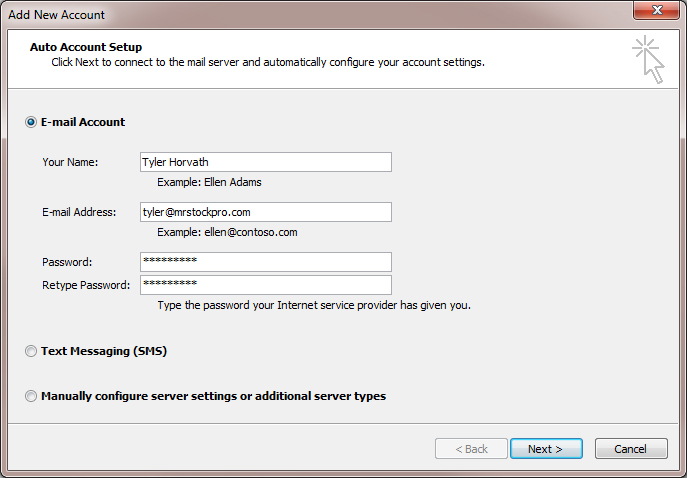
When you have entered in all the correct information, click Next and Outlook will begin to set up your new email account.
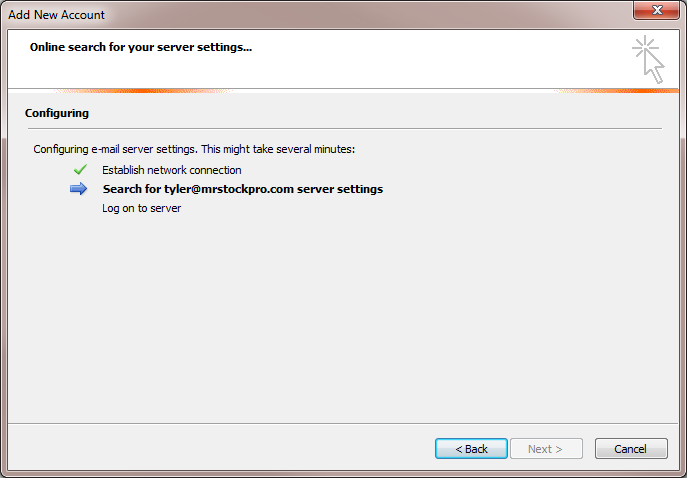
This will go on for a minute or so while Outlook attempts to configure your server settings for you and log on to the email server.
Once it is does it will prompt a message that your new email account has been successfully configured.
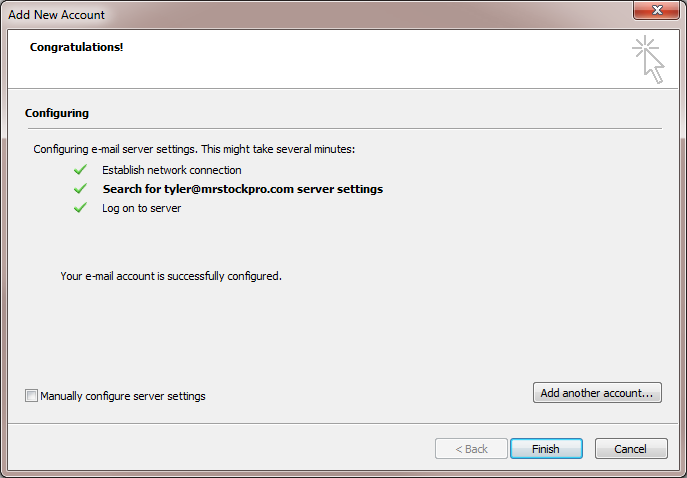
Click finish and your new account is very close to being set up and complete!
First, you will have to restart Outlook in order to see your new Godaddy email account.

Next, when you open Outlook you will be prompted to enter in the information for your new email account again.
Choose ‘Remember my credentials’ so you won’t be prompted every time you sign in to Outlook.

Click OK and your new email should be all set up in Outlook 2010.
You should now see your new email account in the left sidebar of Outlook.

Send a test email to your friends or family and ask them to respond to make sure everything works 100%.
How to Setup Godaddy Hosting
Godaddy has a few different hosting options so we are going to split this section up for each option they offer…Web Hosting and WordPress Hosting.
How To Set Up Godaddy WordPress Hosting
Setting up hosting for a WordPress website is quite simple in Godaddy.
They have 4 different packages from $3.99-$13.99 a month and here they are in detail:
| Plan | Monthly Price | Features |
|---|---|---|
| Basic | $3.99/mo | 1 website, 10GB SSD storage, 25,000 monthly visitors, SFTP access, Free domain with annual plan |
| Deluxe | $4.99/mo | 1 website, 15GB SSD storage, 100,000 monthly visitors, SSH/SFTP access, Free domain with annual plan, One-click staging site, Search engine optimization plugin |
| Ultimate | $7.99/mo | 2 websites, 30GB SSD storage, 400,000 monthly visitors, SSH/SFTP access, Free domain with annual plan, One-click staging site, Search engine optimization for 2 sites, 1 SSL certificate – 1 year free ($69.99 renewal annually), Malware scan and removal for 2 sites |
| Developer | $13.99/mo | 5 websites, 50GB SSD storage, 800,000 monthly visitors, SSH/SFTP access, Free domain with annual plan, One-click staging site, 1 SSL certificate – 1 year free ($69.99 renewal annually) |
Choose the plan that best fits you. I would start out with Basic because I think you will find that Godaddy’s hosting is slow and limited.
Checkout and you will be redirected to the thank you page where you can create your WordPress site.
Click the ‘Managed WordPress’ link to install WordPress on your new server.

You will now start setting up your new WordPress website.
Click the next button with the credits selected.

Next, you will have to choose which type of website you will be installing.
If you are creating a new website that you would like to install WordPress on, then choose ‘I’m building a brand new site’.
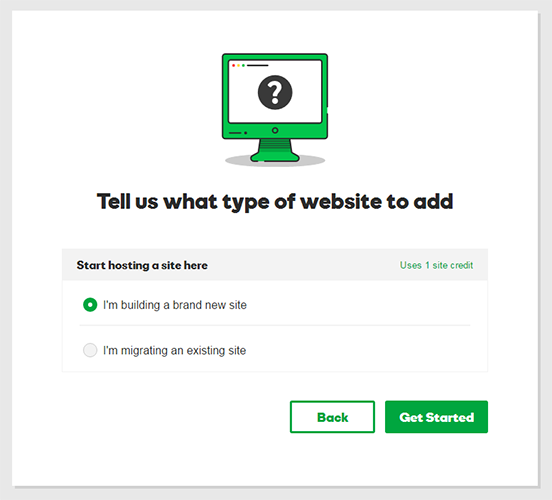
Click ‘Get Started’ and you will choose which domain you would like to install your WordPress website on.
If you do not have a domain yet, you can choose the temporary domain for now but you will have to change it later.

After clicking next, you will now choose which data center you would like to host your website on.
If you are located in the United States then you should choose North America but if you are from anywhere else, choose Europe.
The data center should be closest to where your visitors and website customers will be visiting from.

We are in the U.S.A. so we chose North America.
Now click next and you will set up your WordPress username and password.
These login credentials are used to login to the WordPress backend (wp-admin) where you can create pages, posts, etc.
Make sure you write these credentials down so you have them handy because you will need to use this almost every time you login to WordPress.

When you click Install, your new WordPress website will be created and installed on your Godaddy server.

It takes quite a while for it to install on the server but once it completes it will show you a success message that your WordPress website has successfully installed.

Congrats! Your new WordPress website hosted on Godaddy is now installed…
That wasn’t so hard was it?
Now you can click Go To Dashboard to see your newly installed site’s settings or get started to set up your WordPress settings.

The dashboard is where where you can edit settings for your WordPress site and do other functions like:
-
-
- Updates
- Performance logging
- Basic Settings
- FTP Details
- Backups
- Security
-
If you want to immediately login to your WordPress admin area, then click the WP Admin button and a window will open to your WordPress wp-admin area.
You can also go to http://www.yoursite.com/wp-admin/ to login to the wp admin backend.
If you haven’t set up your settings yet, then this is where you will set them up…
Fill out the needed information in order to set up your WordPress site.

Next, they will ask for your contact information like email and phone number…You can skip this portion and do this later if you’d like.

Click continue and choose which theme you would like to use for your new WordPress website.
Note that you can change this later so just choose a random theme because there are way too many WordPress themes to just pick from 8 of them.

We chose Stout (we are going to change it later) and then allow the script to install the selected theme.

Once it has completed, you will be forwarded to the customize page where you can edit your site as needed…
That is how you set up Godaddy WordPress hosting and install a WordPress website on it!
But what if you are just wanting to set up normal linux Godaddy web hosting with cPanel?
How To Set Up Godaddy Web Hosting
If you are hosting a different software besides WordPress or you want to manage and install WordPress yourself then you will want to get normal Web hosting through Godaddy.
| Plan | Monthly Price | Features |
|---|---|---|
| Economy | $3.99/mo | 1 website 100 GB storage, Unlimited bandwidth, Free email included ,Free domain* with annual plan |
| Deluxe | $4.99/mo | Unlimited websitesºº, Unlimited storage , Unlimited bandwidth, Free email included, Free domain* with annual plan |
| Ultimate | $7.99/mo | Unlimited websitesºº, Unlimited storage , Unlimited bandwidth, Free email included, Free domain* with annual plan , Site backup & restore (paid option), 2X processing power & memory (Linux w/ cPanel only), Premium DNS, 1-year SSL certificate†† to secure customer data and increase search rankings. (Restrictions Apply) |
For example sake we are going to purchase the Economy package but we don’t recommend using Godaddy’s hosting as its very slow and crashes often.
Check out and when you come to the thank you page there will be a link to go to your Godaddy web hosting dashboard.

Click the ‘Web Hosting’ link and head to your new hosting dashboard where you can set up a cPanel account.

Click the big green ‘set up’ button to begin the process of configuring your cPanel account.
The first step is to pick which domain you want to put on the new server. For example sake, we are going to use a parked domain we have, onlyfreshfruit.com.
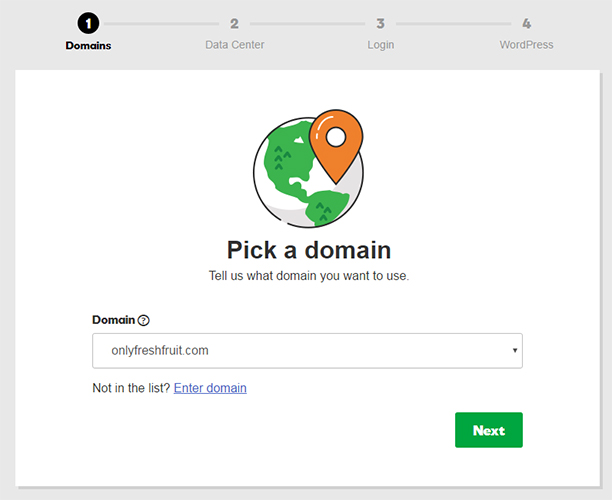
If you don’t see your domain in the list, you can click enter domain to enter it manually.
Click next to proceed to step 2 where you will choose which data center you want to host your servers at.

You should choose the nameserver that is closest to where your visitors will be visiting from.
Since we are based in the USA, we are going to Choose ‘North America’.
Your Godaddy server is now set up and you just need to create a cPanel login.

cPanel is a web interface where you can simply manage your hosting account, allowing you to some of these important functions:
- Create and manage FTPs
- Manage Images
- Create website backups
- Create sub domains
- Create databases and database users
- Create email accounts
- Make site redirects
- Edit DNS Zones
- and a lot more
Make sure to right down or copy this login information to a safe place as you will likely need it in the future.
Click ‘Next’ and you will be asked if you want to add a WordPress website to your domain.

If you click Yes, you will be directed to set up your WordPress website.
If you click No, your cPanel account will begin creating (note that you can install WordPress later using 1-click installs in cPanel).
It will take 1-3 minutes to fully set up and create your cPanel account.
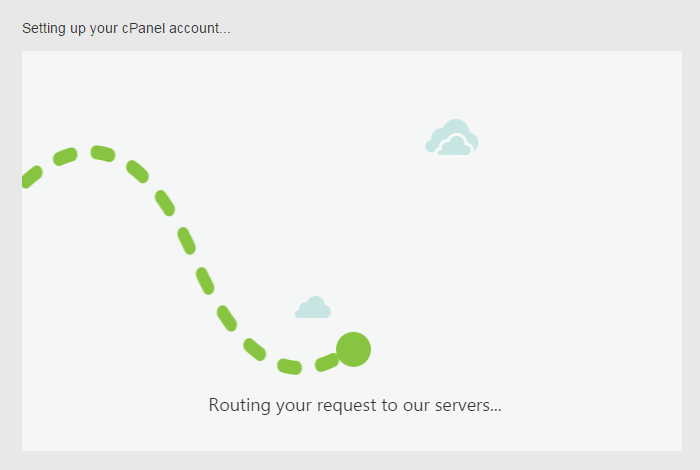
Once it has finished, you will be redirect to your brand new cPanel account where you can set up FTP to upload files or install any of the 1-click install apps like WordPress, phpBB or Pligg.
Your Godaddy Web Hosting account is now setup! Good job!
Now what if you want your new website to be SSL secure?
How To Setup Godaddy SSL
An SSL certificate is a necessity if your website is selling products or accepting credit cards online.
If you have checked out of any online store, then you have seen the green HTTPS in the address bar and this means that the website has a SSL certificate installed that provides security and data encryption.
Having a secure website is also good for on-page SEO and allows your website a chance to get more organic traffic.
Godaddy offers a few solutions to making your website secure:
| Plan | Yearly Price | Features |
|---|---|---|
| One Website | $55.99/year | Secures one website, Strongest encryption on the market, Available in DV, OV and EV SSL Certificates, Boosts your site’s Google ranking, EV SSL turns browser bar green |
| Multiple Websites | $134.99/mo | Secures up to five websites, Strongest encryption on the market, Available in DV, OV and EV SSL Certificates, Boosts your site’s Google ranking, EV SSL turns browser bar green |
| Subdomains | $269.99/year | Secures one website and all its sub-domains, Strongest encryption on the market, Available in DV and OV SSL Certificates, Boosts your site’s Google ranking |
The plans are pretty self explanatory…
If you have a single website, then the first place is probably your best bet.
For examples sake, we are going to choose the one website option.
Simply checkout with your chosen package for a SSL certificate.
Once you have paid for the certificate you will be direct to the thank you page where you will see a link to manage your SSL certificates in Godaddy.

Click ‘SSL Certificates’ and you will be forwarded to the Certificates page where you can see all your current SSL Certificates.

Your new certificate should be listed with the status of ‘Not set up’.
Click the ‘New Certificate’ link to set up the SSL certificate that you just purchased through Godaddy.

You will now choose with domain or website you want to install your SSL certificate on.
If your domain is not hosted at Godaddy then you will need to generate a CSR (certificate signing request) and then send that CSR to Godaddy.
Since our domain is currently hosted with Godaddy, we will select the domain we want to install the SSL on.
Agree to the terms and click ‘Request Certificate’ when you are ready.

Your SSL certificate should now be setting up and it will take about 5-10 minutes to install on your website.
Godaddy will send you an email when your SSL certificate is finalized and installed on your domain.
They mention that it can take up to 72 hours for the necessary DNS changes to take effect.
Once it’s ready, when you login to your SSL dashboard, you will see the following:

This is where you can view the details of your SSL certificate like what domain its on and the validity period.
To check if your SSL certificate is install correctly, head to your website with HTTPS in the URL instead of HTTP.
It should give you no errors and be green in the URL bar.
![]()
To install the SSL security seal, simply copy the code in the box and paste it in your HTML where you want the certificate to show up.
And that’s it! Your website is now SSL secure!
How to Login to Godaddy SFTP
FTP stands for file transfer protocol and its the standard network protocol used to transfer files between a client and a server.
In English, that means its how to upload and download files to and from your website.
If you have created Godaddy hosting then you are able to FTP into your server, upload and download files.
Here is how you do it:
Login to Godaddy and head to the hosting area of the website.

Once you are on the hosting dashboard, look for the basic settings box.
It will contain some vital information about your website including the SFTP username.

Click the view link beside the SFTP user and a modal will pop up showing your FTP details:
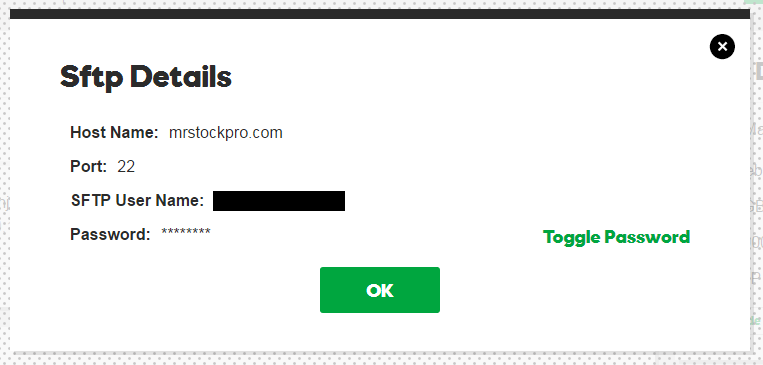
Write down all of this information for future use because we will need it in a different client.
Alternatively, you can also copy the details in a Word or Excel document to save for future use.
Click toggle password to view the SFTP password…Copy or write it down.
Now, you will need to download a FTP client in order to connect to your web server.
We think that Filezilla is a great FTP client for beginner and advanced webmasters.
Download the FTP client and open the program.
Go To File->Site Manager.

This is where you can add your FTP details and let Filezilla save and remember your FTP info so you don’t have to type it in every time.

Click ‘New Site’ and choose a nickname for the FTP account.
We usually just name it the domain name of the website so its easy to see in the list if you have a lot of them (like we do).
Enter in the details that you copied from Godaddy…
-
-
- Host = Your Host Name from Godaddy (usually your domain)
- Protocol = SFTP – SSH File Transfer Protocol
- Logon Type: Normal
- User: Your SFTP User Name from Godaddy
- Password: The password from Godaddy
-
Once you have entered in all the details correctly, click Connect and you will be prompted to add the host key to your cache.
Select ‘Always trust this host, add this key to the cache’ and click Ok.

You should now be connect through SFTP to your Godaddy server.
All of your main files are in the HTML folder which is the main index folder where your files will go.
How To Change Your Godaddy Nameservers
A nameserver is a server on the web that is specialized to handle queries regarding locations of a domain names various services. These servers are a fundamental piece of the DNS (domain name system) which allow the use of domain names instead of IP addresses.
When you change your website to a different host, its often likely that you will need to change your domains nameservers in Godaddy to move your domain to your new hosting.
In this guide, we are going to go through step-by-step, how to change your nameservers in Godaddy to change your hosting. Specifically for example sake, we are going to show you how to change Godaddy nameservers to Tyton Media’s DNS but you can substitute your new nameservers and it will work great!
Find Your New Nameservers
First, you need to figure out what your new nameservers are. If you purchased hosting somewhere, they probably sent you an email containing your new nameservers and they most likely look something like this:
Nameserver 1: ns1.tytonhost.com
Nameserver 2: ns1.tytonhost.com
These are called nameservers and they act as a sort of hosting server for your domain name.
Changing Godaddy Nameservers
Simply find the domain you are moving to your new hosting/server and click the down arrow to the right of the domain name.

Select ‘Set Nameservers’ and a prompt will come up that shows your current namerservers.
If you have just purchased your domain or you have your current domain hosted at Godaddy then you will see the default Godaddy nameservers:

But if you have already changed your nameservers (or your webmaster has) then you will see your current nameservers with the custom radio button selected.
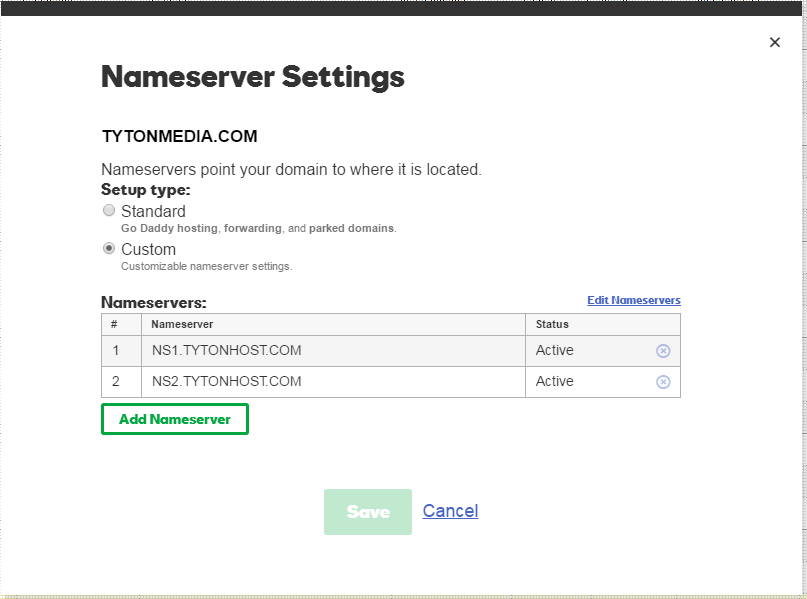
Choose ‘edit nameservers’ to change the nameservers to the new DNS host. A prompt will pop up for you to edit your nameservers.
They usually begin with NS then the number of the server, a period, then the domain name.
Here is what our nameservers are:
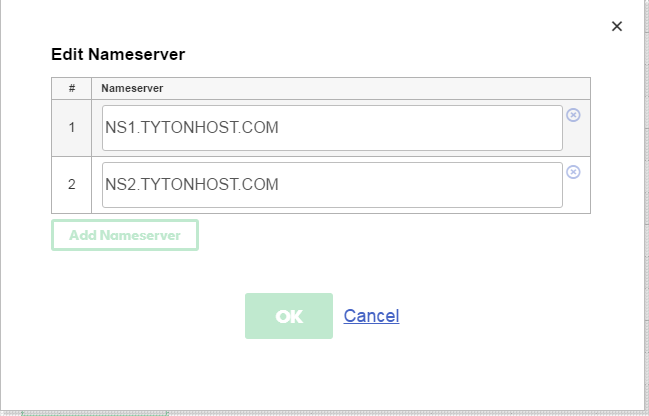
When you have copied in the correct nameservers, click ‘OK’ and your nameservers will begin propagating to your new server.
Updating your nameservers can take anywhere between 5 minutes and 48 hours so you sometimes have to be patient for this part.
Domain Propagation Status
So how do you know when your domain is fully propagated to your new server?
We use the global propagation tool to check the status of the propagation.
Just enter in your domain name that you have changed, and choose the NS option in the select list.

It will show you the current registered nameservers at a list of servers around the world.
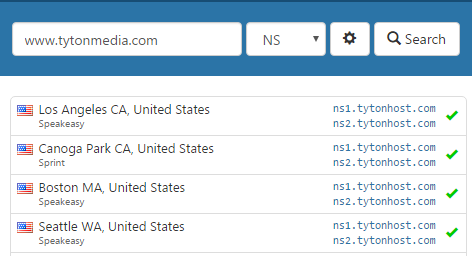
You can also choose the A record in the dropdown list and that will show the current IP address of the domain. This should match your new servers IP address.
Once all of the nameservers are updated to the newest nameservers you entered, then your website should now be accessible from your new server.
Video: How To Change Nameservers in Godaddy
How To Create a Subdomain in Godaddy WordPress Hosting
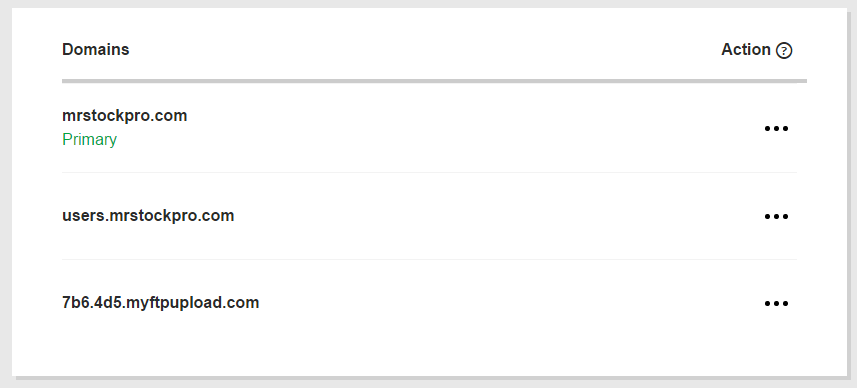
If you are trying to create a sub-domain on your Godaddy WordPress hosting account then this simple guide will show you how simple it is to create a sub domain.
Login your WordPress hosting dashboard and choose the Domains link at the top of the green bar.

You will then be taken to the domains page where you will add your sub domain.
Click on the big green ‘add domain’ button and a pop up will appear where you can add the new sub domain.

Choose ‘Use a domain or subdomain’ and enter in the sub domain you would like to create.

Click ‘add’ and your new sub domain will be ready!
Note that it may take some time for the DNS to refresh and for your sub domain to be available.
You should now be able to see your sub domains folder when you SFTP to your godaddy server.
How To Forward Domains in Godaddy
Fowarding a domain can be useful for many reasons.
One reason is that if you have mulitple domains for a single business like www.mybusiness.com and www.mybusiness.net, you may want to forward one of them so you don’t need a website on both.
If you are wanting to forward a domain in Godaddy, its quite simple.
Just head to the manage domains page and choose the domain you want to forward.

On the domain detail page, look for the ‘Forwarding’ section towards the bottom of the domain settings.
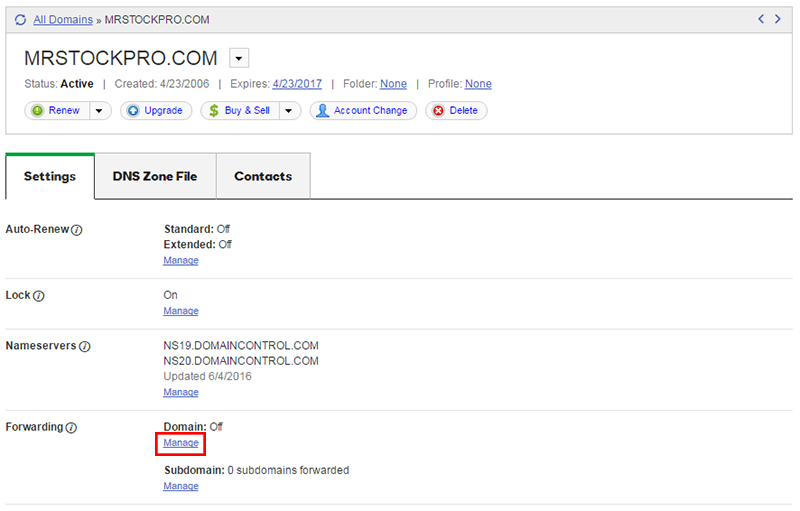
There will be a tiny link that says ‘Manage’.
Click this link and a pop up will appear where you can add your domain forwarding.

Just click ‘Add Forwarding’ and you will get another prompt where you enter in the actual URL that you are wanting to forward your domain to.

Choose whether you want to send it to HTTP/HTTPS, enter the URL, and then choose a Redirect Type.
A 301 redirect is a permanent redirect that tells search engines to replace the old page with the page being forwarded to.
A 302 redirect is a temporary redirect that tells the search engines its a temporary change.
Choose the forward settings, make sure the ‘update my nameservers’ checkbox is selected and click ‘Add’.

You will be brought back to the overview page where you can confirm your settings and when you are happy, click Save.
Your domain is now being forwarded! Good job!
Video: How to Forward a Domain in Godaddy
How to Use the Godaddy Website Builder
The Godaddy Website builder is a simple to use online application that allows you to easily create web pages in under 20 minutes without knowing code or design.
Note: I want to mention that this should only be for personal website. Please do not use this website builder to create business websites as its cheap and not a quality product.
To start head to Godaddy and find the website builder section.
Choose the product you want to use to create your website.
We are using the personal option that features 1 month free and $5.99/month after that.
Choose the domain you would like to create your website on.

Now you must select a theme or template to customize for your website.
Browse the templates and find one that has the layout and colors that you would like for your personal website.
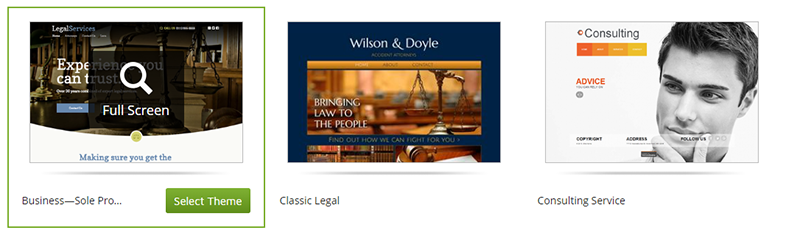
Once you choose your desired template, Godaddy will show your template and now its time to edit it to your liking using the website builder.
How to change text elements in Godaddy Website Builder
To change text elements, simply hover over them and click the edit icon.

How to delete text elements in Godaddy Website Builder
To delete an element just hover over it and click the trash icon.
This will remove the element from your web page.

How to edit images in Godaddy Website Builder
To change or edit an image using the website builder, just click the image you want to edit and then click the image icon.

The ‘Choose Photos’ modal will popup and this is where you can browse your computer or use on of Godaddy’s other services to insert images into your website.
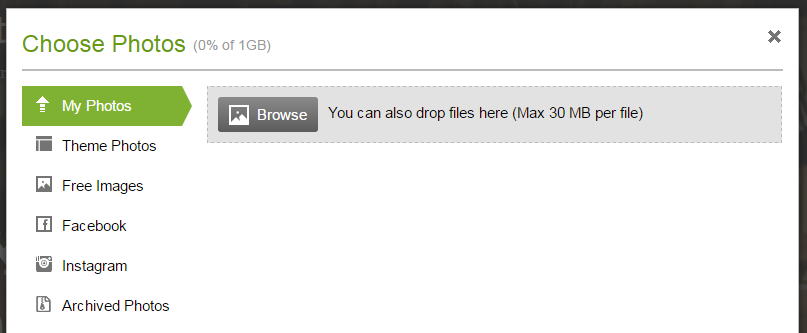
We are going to add an image from our local machine so just click the browse button and find the image on your computer.

Click insert and your image will be replaced with the image you initially edited.
Adding Buttons to Godaddy Website Builder
To add buttons to your website, look at the left vertical menu and find the button link.
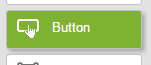
Drag the button link to your webpage where you want to add it.

Click the setting (gear) icon to change the text, color, and URL of your button.
Here, you can edit all the settings for the button.
To link to a page on your website builder, click the red down arrow icon and select the page you want to link to.
You can change the button text in the label field, the background color, the font color and you can even add rounded corners on the advanced tab.
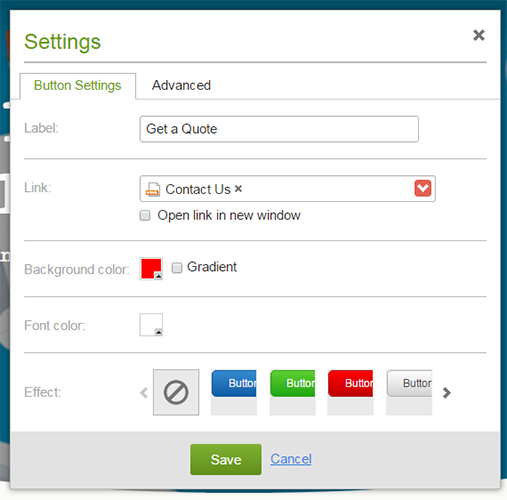
When you are done, click the ‘Save’ button and your new button will now be on your website builder site.

When you are happy with all your changes, click the Publish button at the top of the website builder and your website will be published live!
![]()
FREE SEO Website Audit
Get more traffic online with this Free SEO Website Analysis.